Gatekeeper
| ⚠ Warning: this page pas copied from the old wiki and might not be up to date. |
An updated version of this documentation is at [[1]].
Gatekeeper is a Python script that opens a gate when calling to +32 (0) 484 73 95 88 . It only opens the gate for whitelisted numbers. The hardware consists out of the Dooropener system:
- A beagle board with a Debian based distro on, kindly donated by Bert.
- A remote controller for the gate connected to the beagle board. The pinout on the beagleboard towards the remote:
- Pin 9: white: steering, goes low (0v) when the remote needs to be activated, and high when the remote needs not be activated.
- Pin 13: orange (or any other unused 1.8v pin): continuous 1.8v.
- A Huawei e220 GSM modem with a SIM card to perform caller ID. It is connected with the board using USB-serial.
Contents
[hide]- 1 Configuring Gatekeeper
- 2 Connecting to the BeagleBoard
- 3 Ideas, Feedback & Comments
- 4 Why
- 5 Next plans
- 6 System architecture
- 7 Circuit
- 8 Hardware
- 9 Software
Configuring Gatekeeper[edit]
The gatekeeper script can be found at /opt/gatekeeper/gatekeeper.py and is started at boot. It is located on the Gatekeeper (172.22.32.14) server.
#setup logging
LOG_FILENAME = 'gatekeeper.log'
FORMAT = "%(asctime)-12s: %(levelname)-8s - %(message)s"
logging.basicConfig(filename=LOG_FILENAME,level=logging.DEBUG,format=FORMAT)
log = logging.getLogger("GateKeeper")
The whitelist file uses the folowing syntax and is located at /opt/gatekeeper/whitelist. If a line with the wildcard character '*' is present the gatekeeper operates in public mode: every call from any number opens the gate.
098098987 name
080989790 other name
*
To deamonize the python script this library is used: http://www.clapper.org/software/python/daemon/ and not the ubuntu package python-daemon, just for kicks.
The script is started on (re)boot using the cron facility available in ubuntu. Using sudo crontab -e you can see the current configuration. For some reason the script crashes sometimes and is restarted every 30 minutes. Root cause diagnostics needed!
#starts the gatekeeper script on reboot
@reboot  cd /opt/gatekeeper && python gatekeeper.py

#restarts the gatekeeper script every 30 min
*/30 *  *  *   *     killall -v python && cd /opt/gatekeeper && python gatekeeper.py
Connecting to the BeagleBoard[edit]
The beagle board runs a debian based distro so it can be used as a general purpose server. If you want to do something with it ask for a login and sudo rights. Connecting with the board is possible using ssh. Internally it has 172.22.32.11 as IP address, ssh on port 22 (default ssh port). Externally it is accesible with ssh on hq.0x20.be, port 2222.
Ideas, Feedback & Comments[edit]
Add your own!
- We can make the door opening for all people on Thursday, and only for members on the others...? @Joren: Is this pythonable?
- Something like that has been implemented: adding an empty line with * to the whitelist puts the script in public mode. In public mode everyone is allowed to open the gate when calling +32484739588. Removing the line with the wildcard puts the script in private mode, then only whitelisted members can open the gate.
- We can sound an alarm when people try to open the door but are not allowed.
Why[edit]
The lease of the space gives us three remotes to open the gate. We're coming up to 20 members now. So we decided to take one remote, mount it in reach of the gate and hook it up to a computer with a huawei modem. The idea is: you call the number of the modem, it checks the caller id against a text file, and if it's in there it switches the remote. Best of all: 'just letting it ring one time' doesn't cost money and opens the door. It's democratic because all our members have a cellphone, not all have a smartphone.
Next plans[edit]
- Make a webinterface (Integrate with spacecontrol)
- do something with pgp keys and smartphone.
System architecture[edit]
All hardware will be divided in three cases:
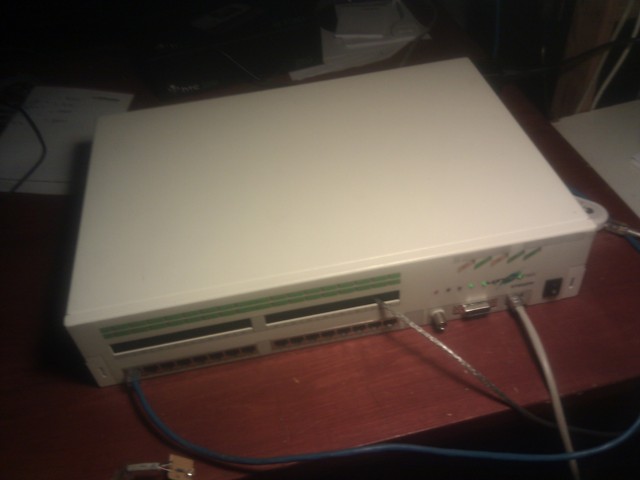
- A computer running the Gatekeeper software (currently the Audio server) and connected to a Huawei modem and a Launchpad in a Terminal server case.
- An old ATX PSU and a junction board containing a TI Launchpad board.
- A plastic IP65 junction box to be placed in front of the gate.
- A cat5 UTP cable will connect the front junction box with the one in the space.
Circuit[edit]
The current circuit is a PNP transistor that, when base goes high (+5V), connects the Terminal PSU to a relais in the junction box that turns on the remotes (as if its buttons were pushed). Since we migrated from the beagle board to the Launchpad only the right half, From the 1K resistor on, of the diagram is used.
Hardware[edit]
Lantronix case (obsolete)[edit]
Power supply[edit]
The original Lantronix PSU can be reused. It gives the following outputs on a 6-pin molex:
| Pin Number | Color | Voltage |
|---|---|---|
| 1 | RED | +12 |
| 2 & 3 | BLUE | +5 |
| 4 & 5 | BLACK | Ground |
| 6 | YELLOW | -5 |
TI Launchpad[edit]
Pinout on the Launchpad towards the gate opener:
- Pin 1.7: white: 5V on/off (when high, remote gets "pushed")
- Pin GND: black: ground (required to make sure we have a stable ground shared between the usb-computer connection and the terminal server PSU)
Stripboards[edit]
The two print boards, from RIGHT to LEFT: power connected to the inverter - now modified to act as passthrough (this pic is old), connected to the relais steering, connected to the ethernet cable (unclear).
Invert steering (passthrough)[edit]
The stripboard contains the following:
- 5-pin power input connector:
- blue (5v) (from psu)
- red (12v) (from psu),
- black (ground) (from psu, Launchpad),
- white (0v or 5v when relay needs to be closed) (from Launchpad) and
- orange (not connected).
Not used:
- 2x 10k ohm in series
- a PNP transistor (bc557b)
- Power output pins towards the next stripboard for steerin the relais:
- blue (5v)
- red (12v)
- white (0v or 5v when relay needs to be closed) and
- black (ground)
Steering relay[edit]
The stripboard contains the following:
- 4-pin power input lines
- blue (5v)
- red (12v)
- white (0v or 5v when relay needs to be closed) and
- black (ground)
- a 1.1K ohm resistor
- an NPN transistor (bc547b)
- Power output pins towards the remote
- pair ground and 0/5V: for steering the relais (brown pair)
- 5v
- ground
- pair ground and 12V continuous: for powering the remote (blue pair)
- 12v
- ground
- pair ground and 0/5V: for steering the relais (brown pair)
RJ45 output connector to the IP65 case[edit]
- left first RJ45 connector on terminal server acts as output connector
- Connected to the stripboard
- the pins on the connector have all been soldered, T568B style.
On the RJ45 connector is present:
- one pair carrying power to the remote (+12 Volt continuous plus ground)
- we are using the blue pair for this
- one pair carrying the signal to the relais (+5 Volt if on, plus ground)
- we are using the brown pair for this
- the +5V comes from the PSU, but the beagle bord does the switching through pin 9 on 1.8v
TQ reverse engineered the pinout and gathered the following details:
- Pin 4 is 12V
- Pin 5 is Gnd
- Pin 7 is floating, but pulled to ground by the relay steering
- Pin 8 is 5V
Thus, solid is a fixed voltage; stripe is ground (possibly floating)
Local junction box[edit]
Power supply[edit]
An old ATX PSU was used. One of the 4 pin connector was replaced with a 3 pin version to server our purpose.
| Pin Number | Color | Voltage |
|---|---|---|
| 1 | BLACK | Ground |
| 2 | YELLOW | +12V DC |
| 3 | RED | +5V DC |
Build in control leds LED[edit]
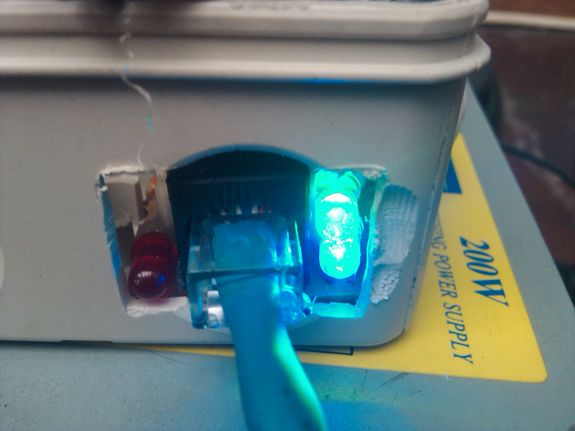
The current version has three control leds build right in the power distribution/Launchpad box. When the system is on both leds on the right should be lit. If this is not the case the system will definitely not work. In this case the first thing you should check if the PSU is properly connected. When an authorized phone call is being received the red led on the left will blink.
| location | color | function | status |
|---|---|---|---|
| Right bottom | Blue | 12V line is active | Always on |
| Right top | Green | 5V line is active | Always on |
| Left bottom | Red | The signal to open the gate is being send | On intermittently when an authorized phone call is being received |
Other[edit]
Sections TI Launchpad and Steering relay mentioned above still apply.
Door opener tester[edit]
Old version[edit]
Simply a RJ45 male plug with a led attached to the brown pair. To be inserted into the connection of the remote. Allows developing software and hardware and testing the door without actually making the door go open. When the led is on, the remote is pressed.
New version[edit]
Similar to the previous version this can be used for software testing. In addition to the first version is will also show if both supply voltages are OK. Bottom right clear red led indicates if 5V DC is OK, the bottom left clear led is for the 12V DC, The top regular red led is only lit when the signal is being send. (A income call is received.)
IP65 Junction box[edit]
Remote[edit]
Stripboard[edit]
The stripboard contains the following:
- Two RJ45 connectors
- RJ45 connector on the bottom (IN) to receive power & signal
- Relais
- Remote
- Double line male pins, with female connector connected to in ethernet cable
- currently only the first row is used
- first brown pair and then blue pair is connected
| Pin | Usage |
|---|---|
| 1 | 5v relay steeriong (brown) |
| 2 | ground |
| 3 | 12v remote power (blue) |
| 4 | ground |
- Single line pin header with following connections:
| Pin | Usage |
|---|---|
| 1 & 2 | First button |
| 3 & 4 | Second button |
| 5 | +12V continuous power |
| 6 | Ground |
| 7+ | Unused |
Software[edit]
Gatekeeper[edit]
For the gatekeeper python script, see Gatekeeper
msp430-gatekeeper[edit]
Software running on the launchpad, providing 2400bps connection over usb, send u to open gate for +/- 1 sec, d to force close the gate.
Host computer (obsolete)[edit]
- Currently audio is used as the controlling computer. This computer is booted automatically every evening (bios setting) and shuts down in the morning (cron job). (do not turn this server off!!)
Relays[edit]
http://www.teracom.cc/docs/products/
Problem[edit]
You are outside, you have a key for the door of the space but no fancy-schmansy garage port opener.
Expected outcome: the door opens.
Events[edit]
Day 1[edit]
stuff that happened[edit]
- A huawei dongle that catches incoming numbers with a python script (see Joren's blogpost)
- Research on the build of the remote, conclusion: "not that simple", result : get a relay over the buttons powered by arduino via a transistor.
- Made schematics for arduino
- An asterisk server that also fetches phonecalls but probably won't be used in this project.
the gameplan[edit]
Discussion in the end gave us some idea on architecture:
- Beagle board running linux (B)
- Usb hub (B?)
- Huawei dongle (J)
- Usb wifi key / or usb network card (H)
- Arduino (P) -> Relay -> dooropener (P)
Resources[edit]
- one utp cable running from space to appt in front.
- one remote we can hack
- server running in the space
- Random electronics (including an arduino)
Challenges[edit]
- Be able to open door by using wifi
- Be able to open door via the interwebs
- Be able to open the door with your cell phone.
- If possible: not necessary to leave a pentium running all the time (power)
Details[edit]
Remote[edit]
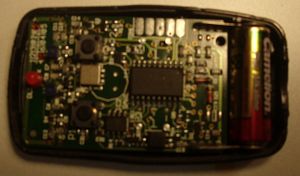
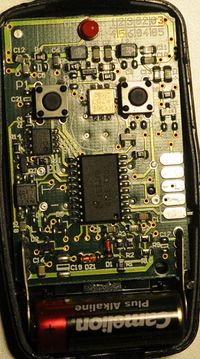
- Main chip : XE34AB / NICE FRO1
(can't seem to google it... maybe bad eyes)
- The small 8-pin DIP labelled "93LC46" is a 1K EEPROM manufactured by Microchip. (datasheet)
- NEC 2701 is a lowpass filter (datasheet)
Template:Project This is the page with the reverse engineered information got out of the undocumented spinoff project which apparently has replaced Gatekeeper.
Hardware[edit]
- Model: soekris net-something
- CPU: AMD Geode 233Mhz (< check this)
- RAM: 128MB RAM
- Storage: CF disk ????MB.
- OS: 3.2.0 Linux-based Debian derivative
Help, Help, The Gatekeeper Is Borked!![edit]
Change log of the maintenance performed on the Gatekeeper box, as well as the issue is resolved/created:
System doesn't boot[edit]
Symptoms[edit]
serial console goes past POST screen, GRUB started counting down, and reboots after the linux kernel is loaded without mentioning that it loaded the initial RAM disk.
Thing that fixed it[edit]
- Reboot to recovery mode (2nd option in the GRUB screen). If you only get the GRUB countdown, press <ESC> when you see the countdown (3 seconds normally. Push hard.)
- Log in, root password is on the wall
- $ update-grub2
- $ reboot
- ???
- PROFIT!!!!


